Sunday 27 February 2011

Week 5


Modelling continued


Continuing from last week i welded the rest of the body parts together. this was a relatively easy process, which worked the same as welding the neck to the body. sometimes the insert vertex tool was used when extra joints were needed. welding does not work on closed faces so the capped faces on the arms and legs needed to be deleted before joining to the body.

one problem i found was some vertices would not weld. i found the solution to the problem here: http://www.gameartisans.org/forums/showthread.php?t=14071

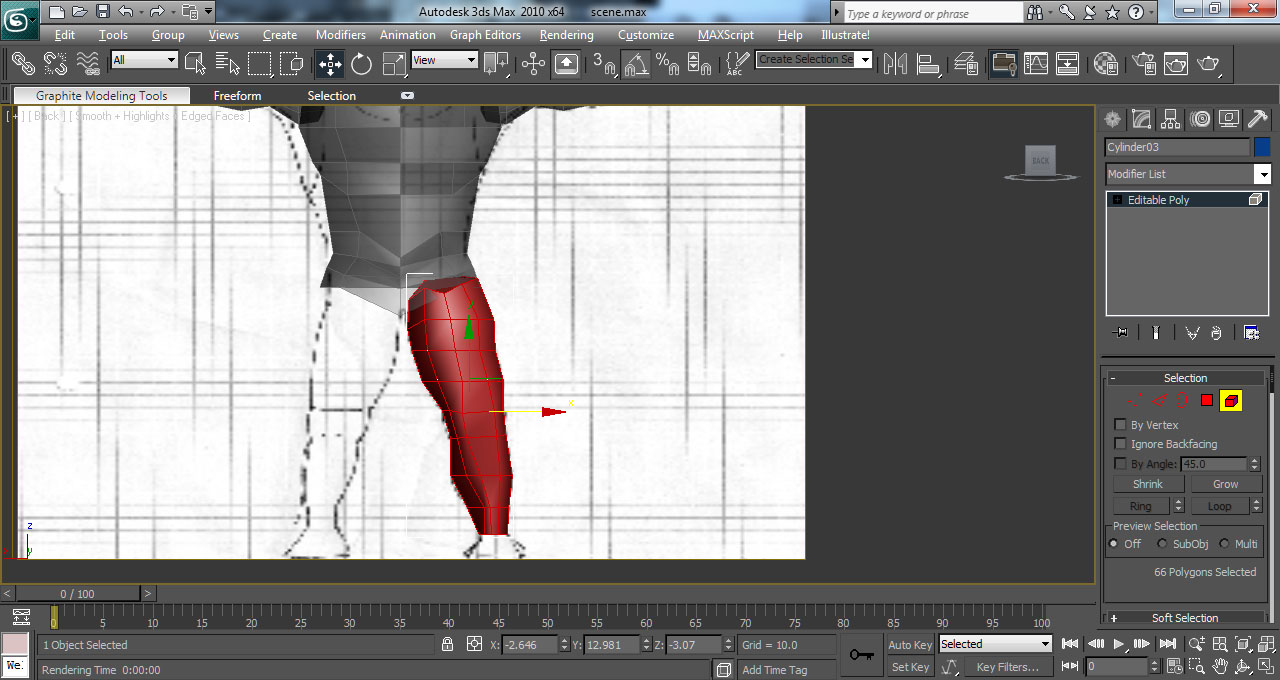
the problem was caused by flipped polygons. these are shown darker red than the other faces when selected so it is generally easy to find which faces need to be flipped using the flip option in the polygon rollout. flipped faces do not render as they are backwards and therefore the normals are the wrong way round. this is another way of finding flipped polys, to do a quick render and see which areas don't show up.

when joining the legs i added a section at the groin area so the legs could move independently of each other. Paul Steed (2003) writes, "Never have the upper legs join in the groin area. keep a gap at the groin to ensure the legs will look right when they're in motion".


when attaching the shoulders i added extra edges around the shoulder area to stop the textures stretching when the arm moved. to add the edges the connect tool was used, by selecting two edges and pressing connect, which adds an edge between.


For the hands i imported the hand model from week 1 into the scene and attached it to the body. i then welded the arm and hand together. i used a symmetry modifier when i imported the hand and lined up both hands first, to save doing the same job twice. for this to work the modifier stack needs to be 'collapsed' after the hands have been mirrored correctly, so that the mirror is no longer in effect when the hands are connected to the body; if the modifier was still active the whole mesh would be mirrored again giving two bodies.


the hand was smoothed a lot so when i imported it i used an optimiser modifier to lower the poly count. this did the desired job but the hands will need edges added at the knuckles if they are to be animated.

i created the feet by box modelling as they only needed to be simple shapes.


the body mesh is now complete. here are some images from different angles:


this render of the mesh shows the smoothing groups at work.


the final step is to add the eyes and hair.


Steed, P., 2003. Animating Real-Time Game Characters. Massachusetts: Charles River Media Inc.

Game Artisans, 2010. Vertices that won't weld. [online] Available at: <http://www.gameartisans.org/forums/showthread.php?t=14071> [Accessed 3 March 2011].


Monday 21 February 2011

Week 4

Modelling continued.


continuing from last week, the next step was the forehead. this is easily done by extruding up the edges from around the eyes, and then curving the top.


the overall head shape was then completed by carrying on the extrusion of the forehead and curving it over the top of the scalp, keeping in line with the side reference image in particular. the nose was then modelled by extruding the faces around the bridge of the nose, and then connecting edges using the bridge tool. the shape was created by simply moving the vertices around to match the reference image.


to complete the head, the neck was needed. this involved extruding down the back of the head, making sure to create as many extrusions as needed to weld accurately with the side of the head.


the completed head, with added definition around the eyebrows.


after completing the most complicated part, the body was relatively easy. this tutorial was used to help with body modelling, as the simple method was easy to use, but also gave a great end result : http://www.3dtotal.com/team/Tutorials/benmathis/benmathis_body_1.php

the tutorial idea is to use cylinders to model the body parts, as the human body has a cylindrical shape. using an eight sided cylinder gives all the necessary sides needed for a low poly character.


first the arm was modelled. a cylinder was placed along the reference image, and then the edges and vertices moved to represent the shape . this gives the definition of the arm including joints and muscle shape.


to make the body the same method was used, however this time it was a lot more important to look at both sides of the reference image. the first image shows the front. definition has been added around the pelvis and abdomen, and some around the chest.


here is the side image. definition was added for the chest and the shoulder blades.


a symmetry modifier was added to each part.


the legs were modelled the same as the arms. again the importance was on lining them up in both the front and side views, as there is a lot of definition in both.


the final step was to weld the parts together.

first the neck and head were attached at the object level, by selecting all the vertices of the head and then using the attach button. they can now be welded together.


the back of the neck was redone as there were too many faces, which meant it was hard to weld. the image above shows the much improved neck, with just 4 faces at the very back. to achieve the small amount of faces, the insert vertex tool was used. this allows vertices to be added along and edge without creating extra edges or faces. this meant that the multiple faces of the head could be welded to one edge on the neck (this can be seen in the above image, the one edge from the neck has been welded at many points, when there are about 6 edges on the head). the back of the head was also rounded more so re-doing the whole area was very beneficial.


Mathis, B., n.d. Low poly character modelling. [online] Available at: http://www.3dtotal.com/team/Tutorials/benmathis/benmathis_body_1.php [Accessed 21 February 2011].

Tuesday 8 February 2011

Week 3

Character design

Renard, star of the Statetown Circus!


I decided to create a slightly different character from 'Prince Charming' as i thought this had been used a lot. i wanted a character who would have the same charisma and features. the first thing that came to mind was a celebrity, and i then decided on a gymnast character as the body shape fit this role. i used features from research in week 2, for example the large jaw and posing. i added a curled moustache to show the characters European heritage in a stereotypical way. this type of moustache also fits in with the stereotype of old gymnasts and body builders, making a recognisable character for the young audience.


Above: an 'old fashioned' weightlifter.

One pose i drew above shows 'Renard' standing tall and looking very proud. this was to show his pride in his work, and his love for impressing his fans.


this second set of poses show some more actions, including swinging and landing from a jump. these are the sort of actions the character would be doing.


the next step was to draw the character up in neat from the front and side. the images were drawn on squared paper to ensure they lined up and proportions were stuck to.


the character was drawn in a neutral pose to help with the rigging process.


Modelling

after setting up the scene like in the week 1 hand reference, the modelling was started.

plane modelling was chosen as the best method for creating the mesh, as it gives the most flexibility.

a good place to start modelling is around the eyes, so a plane was placed beneath the eye and extruded out and around multiple times. a symmetry modifier is added to the plane and the mirror placed at the centre of the reference image, so that only one half needs to be modelled. the mesh also welds at the mirror, or seam, which helps join the two halves.


the eyes in the image above are actually flipped the wrong way round the z axis. this was fixed later on.

the next step was to create the mouth, using the same method as the eyes. when the mouth was completed, it was attached to the eyes using the attach button in the edit geometry roll-out. this turns the two objects into one object.


the first image shows the setup in the 4 view ports.


once the mouth was completed the jaw could modelled, by extruding down all the edges along the bottom of the mouth. at the bottom of the chin the edges were rotated to create the curved surface.


the mouth and eyes were the joined together by using the bridge and weld buttons. bridge creates a face between two or more selected edges, and weld joins two vertices into one. these are both useful tools for connecting, but weld is better for keeping the polygon count lower.

Sunday 6 February 2011

Week 2

I watched some cartoons and collected some images and videos that show a strong sense of character. the character i have decided to make is a 'handsome prince' style character. therefore he needs to be confident and in good shape, but also slightly clumsy because of his vanity.

the first character that came to mind was 'Prince Charming' from the Shrek (Dreamworks, 2001) series.


Shrek is 3D so this is even more helpful. his type of character is obvious even from this still image; he has an arrogant smile and raised eyebrow, and also a well groomed hairstyle. some elements of this character are what i am looking for but not all. the human characters in Shrek are very realistic in proportions and i would like a more cartoony look.

the next character i looked at was Johnny Bravo (Partible, 1997). he is a 2d character but has a huge amount of character.


the still image doesn't capture the whole style so i found a video clip. this clip is the intro to the cartoon.


Johnny Bravo is extremely vain and loves to show off his physique and check out his flamboyant hairstyle. his movements convey this through lots of 'flexing' and generally posing a lot to show his confidence, as if he owns the stage. as with lots of vain characters he does have a clumsy or stupid side, which is shown by him getting rejected by the woman at the end, where he ends up on the floor in a heap. he maybe relies on his looks too much, where a more evil character may be slightly smarter.
the shape of his body is great in showing his superior strength, by giving him small legs and a large upper body. this 'upside down triangle' shape would be great for my character.


the final character i found was Stan from American Dad (MacFarlane, 2005). i chose Stan for his extremely chiselled jaw, which uses a lot of exaggeration, a classic cartoon technique.


Modelling practice

I practised modelling Johnny Bravo's head using two different modelling styles.

the first style i tried was modelling with a cube with a spherify modifier attached. the spherify modifier smooths out the cube and removes the sharp corners. it is better to use this method than modelling with a sphere prefab as there is more control over how many faces the shape has, and how equally spaced they are.


This technique is difficult to use as it is hard to select the right sections of the mesh to move around without affecting others. there are too many faces in some areas and not enough in others, as at the start there are equal amounts of faces. areas like the eyes need more faces however which means they must be created using the cut tool. spherify also clashes with the smoothing groups, which messes up the shading in some areas.


some tools i used with this method were the bevel tool and the chamfer tool. bevel was used to extrude and then taper the ear shape out from the face. the chamfer tool was used to add extra rings at the eyes, by selecting an edge which creates two new edges.


the second method i tried was the box modelling method. this uses a cube shape, which can then be edited to fit the shape of the face by moving the vertices around.


this method is a lot more useful as it can be customised much easier by adding new vertices and changing the amount of faces in each dimension of the shape. secondly the mirror or symmetry modifiers can be used so that only half the face has to be modelled. this is very useful as it makes sure both sides of the character are the same (as long as this is desired).

i found the best way to use this method was to line up the horizontal lines with the facial features (eyes, nose, mouth) and then move the vertices into the shape of these features e.g moving the vertices around the nose inwards to create the bridge. new faces can be made easily by using the shift + drag extrude, and new faces created within the model by using the connect tool after selecting edges. the object must be an editable poly to use this tool.


Shrek. 2001. [Film] Directed by Andrew Adamson and Vicky Jenson. USA: Dreamworks

Johnny Bravo, 1997. [Cartoon] Cartoon Network

American Dad!, 2005. [Cartoon] Fox