Friday, 4 November 2011
Thursday, 14 April 2011
Week 11-12
Animation
i decided to create the animations separately and then fade them together using After Effects.
Part 1: Flip
to create the flip the hands were left in a pose above the head, and the body rotated around them as a pivot. the fingers are closed to show the character holding onto something, a pole for example. to create the landing the character mesh was moved along with the controllers to create a change in position. after he lands the character sways slightly to show him trying to balance, and then stands up tall and proud after completing a good flip. finally he shakes off and relaxes.
Part 2: Tightrope
to create the feeling of balancing in this movement, i made the character move slowly, placing each foot in front of the other and arms out to help balance. he also sways left and right while moving to show the change in weight.
Part 3: Walking
this animation is a simple walk cycle. to add some extra dynamics the character looks around the scene. the main points which i focused on were to move only one foot at a time to avoid sliding, and also to rotate the feet slightly when moving to show the 'heel/toe' motion.
Part 4: Bowing
before the bow the character moves back his arm in anticipation of the swinging movement. he also steps forward and shifts his weight slightly. he then flexes while turning his head to show vanity.
Part 5: Waving
this is the end scene, showing him waving to his fans and then leaving. while waving his arm he turns side to side and looks around, acknowledging everyone in the crowd. he then turns around to leave.
Reflection
Overall a believable character was created by using personality and body language, and also appropriate actions.
the character mesh turned out very well, especially the head, which has a lot of character, with its strong jaw and flamboyant hair. the body also had a good shape to reflect the type of character.
the rig gave good control for animations, and had all the necessary controls for a human character, including hands and elbow and knee directions. the latter had the most effect as it gave the character a much bigger movement range, allowing the most defining poses to be made. one change which could have been made is to make the knees slightly higher to allow better bending poses.
finally the animations were successful in showing a strong character with a believable persona. the characters actions and body movements helped to strengthen this. the animation itself was generally smooth and some animations, especially the tight rope walking, looked very realistic, while still having a cartoony feel. one animation that could use improvement would be the bowing scene, where the arm moves too fast across the body, as well as moving slightly unnaturally. also the face rig could be enhanced with facial animations, for example mouth movements. this could be achieved using the morph modifier if there was more time.
I am very pleased with how most of the animation turned out, and have definitely learned a lot of essential skills in modelling and animation.
Week 10
Storyboards
Below are the storyboards for the characters animation. this will make it easier to animate as all the actions will be planned, and the main poses have been decided on. i decided to show my character doing a variety of actions, including flipping, swinging, walking, tightrope walking and waving.


Audio considerations
The character is a circus gymnast, so the music would probably have to be some sort of fairground style tune. the character himself would have a deep voice, with a french accent. he would speak loudly to show confidence, one of his main characteristics.
Body language
The character is defined more by his actions than his body language, though these two do link together. he has many 'crowd pleasing' moves such as the high flying flips, bowing and flexing, to emphasise his love for performance. he is also very proud and confident, shown by looking around and keeping his head and shoulders high.
Week 9
Skinning
i decided to try using the skin modifier technique which i had tried in class.
the skin modifier assigns all the meshes vertices to the selected bones by using envelopes.
to set up the skin modifier it needs to be added to the stack first. next the add bones button is used to select the bones to follow. i used all the bones as every bone was needed for a fully moving body.

shows all the bones to be selected.
After connecting the bones the mesh follows the bones movement.
under the skin modifier rollout there are options for modifying different areas of the mesh; the most common would be vertices. after selecting vertices the envelopes are shown and vertex weights can be edited.

the screen after applying skin modifier and selecting vertex group. the left forearm envelope is selected.

once a vertex is selected its weight can be changed. this does not have to be done to all the vertices, just the ones which are weighted wrong. to try and find the correct vertices to edit, i placed the model in various poses and found out of place vertices. to edit the weights the weight table is very useful as it shows what bones each vertex is weighted to.

once one side of the model was weighted i used the mirror mode to copy the weighting to the right hand side. this is done by first selecting an envelope and then clicking mirror mode. next select all the vertices on the left hand side and then press either copy blue bones to green bones, or blue verts to green verts. in my case it was vertices.

mirror mode clearly showing the green vertices which would be given the blue (left hand side) weighting information.

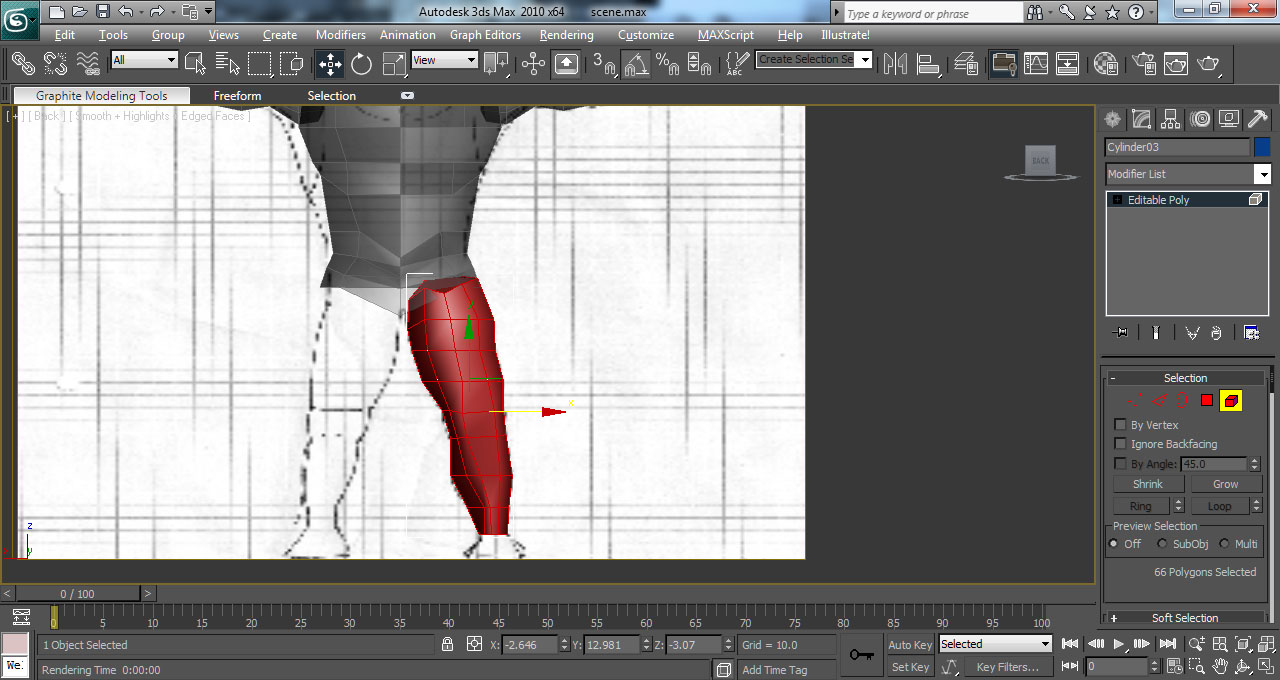
the skeleton is now skinned correctly. the image above shows the character in a position where the leg is at an extreme rotation, however there are no longer any errors in the mesh because the weighting is now correct.
Texturing
To texture the model the Unwrap UVW modifier was used. this works by making a UV map, which can be edited for easier texturing.

above is the texture map. the eyes (spheres) have been enlarged and moved to allow for higher resolution on the pupils. the upper body was unwrapped separately using back/front mapping, as the front and back of the characters vest are slightly different.


Wednesday, 23 March 2011
Week 8
Rigging (continued)


Before continuing the rig, i decided to add a little more detail to the mesh and make some final changes.

firstly i added slightly more definition to the feet by making a big toe shape. this just adds more detail without affecting the face count very much.
the next step was to add fingers which could be animated. to do this i decided to start the hands again, as it would take longer to try and fix the current hands.


the final tweak was to slim down the arms and thighs, as they were too large when i tried animating with the previous rig, and crossed over too much when the arms/legs bent.
i refined the character rig by adding more control objects, which allowed for more controlled bone movement.
i added controllers for the head and both eyes. the head controller is linked with an orientation constraint to the control object. the eye bones are linked to the head bone. the eye objects each have a control object with an orientation constraint. the controllers are linked to the head. finally the head control object is linked to the root so that it stays with the body.

constraints allow good control over rotation without affecting the position or IK chains.
i changed the rig for the arms to allow more control.
here is the new arm rig:

the purple controller is for the elbow rotation. this allows the arm to be rotated independent of the bend. is used 'pick target' to select a target for the IK chain to follow. moving the control up and down rotates the arm at the elbow.
the green controller is linked to the IK chain to move the arm, as well as being linked to the hand as a constraint, to allow rotation. this gives lots of control for different postures.
the last control is also connected to the green sphere. the sphere has a two custom parameters (circled in red) which control the fingers and thumb. i decided that moving all the fingers at once was high enough detail for this character. to create the movement the parameters were wired to the rotation values of the fingers, and the same for the thumb. this creates an easy control for the finger movements without any IK.

Tuesday, 22 March 2011
Week 7
Rigging
to create the skeleton the bone tools window was used as it has all the options needed in one place. to create bones, the 'create bones' button must be pressed and then click and drag in the screen. when left click is pressed a new bone is started which is linked to the previous bone. to end a bone right click; this makes a bone nub, which can be deleted.
i started with the thigh bone and made 3 bone links; the thigh, calf and a small nub for the ankle. i put a bend in the leg at the knee to help with the IK solver which would be applied later. to make a second leg i used the mirror tool in the top toolbar.


to check that the bones orientation is correct the fins options can be turned on. i used the front fin to make sure the bones were the right way round i.e the front of the bone facing forward.
next i created the root bone which is used to control the centre of gravity and the characters waist/hips. this was just a single bone similar to the foot but slightly smaller, positioned in the centre of the character.
for the spine/body i used 3 bones travelling vertically from the root (but not linked to it), and then added one small bone for the neck and another for the head.
the shoulders are a short bone positioned just below the neck bone. i used mirror again to create a second shoulder bone. to arms were created like the legs, by dragging three bones out and then having a slight bend to help the IK.

Image above shows the eye bone, which is used to move the eye by rotating it. it is linked to the head.

after creating the skeleton, the bones needed to be linked together, using the select and link tools. the upper arm bones was linked to the shoulder, the shoulder to the top spine bone, the third spine linked to the root and both thighs to the root.


next the IK chains were added.

IK chains were used in the arms and legs.
to control the movement of the bones, control objects were linked to the chains. the chain is the child of the control object. this allows movement of the chain without selecting it directly.

Foot controllers

Moving the foot controllers moves the legs with IK motion.

The same principle is used for the arms...

...and the root


Moving the root object controls the whole body, and therefore bends the knees.
the rig works well as the controllers allow easy access to the IK chains, however the arm control is limited. my character will need more complex arm movements, so i will need to look into how to get more arm control, namely separate rotation and bending.
another improvement needed is to add fingers to the hand, but first the mesh needs to be edited itself to allow for finger animation.
Sunday, 6 March 2011
Week 6
Modelling continued.


to create the characters eyes i decided to use spheres. this is a higher detail way to make the eyes but i thought it would suit the cartoon style to have large round eyes. using the front view, i placed a sphere in the first eye socket. after lining it up in all the axis the faces around the eyes needed to be tweaked to fit around the eyeball, otherwise the inside of the head would be visible through gaps. to create the second eyeball i simply duplicated it and moved it along.

the characters hair was kept simple to not use too many polygons, as it was easy to make the basic shape using a box with multiple subdivisions. by moving the vertexes the box was shaped around the head. at the front the 'quiff' was modelled by dragging vertices upwards and to the side.


Sunday, 27 February 2011
Week 5
Continuing from last week i welded the rest of the body parts together. this was a relatively easy process, which worked the same as welding the neck to the body. sometimes the insert vertex tool was used when extra joints were needed. welding does not work on closed faces so the capped faces on the arms and legs needed to be deleted before joining to the body.
one problem i found was some vertices would not weld. i found the solution to the problem here: http://www.gameartisans.org/forums/showthread.php?t=14071
the problem was caused by flipped polygons. these are shown darker red than the other faces when selected so it is generally easy to find which faces need to be flipped using the flip option in the polygon rollout. flipped faces do not render as they are backwards and therefore the normals are the wrong way round. this is another way of finding flipped polys, to do a quick render and see which areas don't show up.
when joining the legs i added a section at the groin area so the legs could move independently of each other. Paul Steed (2003) writes, "Never have the upper legs join in the groin area. keep a gap at the groin to ensure the legs will look right when they're in motion".

when attaching the shoulders i added extra edges around the shoulder area to stop the textures stretching when the arm moved. to add the edges the connect tool was used, by selecting two edges and pressing connect, which adds an edge between.

For the hands i imported the hand model from week 1 into the scene and attached it to the body. i then welded the arm and hand together. i used a symmetry modifier when i imported the hand and lined up both hands first, to save doing the same job twice. for this to work the modifier stack needs to be 'collapsed' after the hands have been mirrored correctly, so that the mirror is no longer in effect when the hands are connected to the body; if the modifier was still active the whole mesh would be mirrored again giving two bodies.

the hand was smoothed a lot so when i imported it i used an optimiser modifier to lower the poly count. this did the desired job but the hands will need edges added at the knuckles if they are to be animated.
i created the feet by box modelling as they only needed to be simple shapes.


the body mesh is now complete. here are some images from different angles:


this render of the mesh shows the smoothing groups at work.

the final step is to add the eyes and hair.
Game Artisans, 2010. Vertices that won't weld. [online] Available at: <http://www.gameartisans.org/forums/showthread.php?t=14071> [Accessed 3 March 2011].
Monday, 21 February 2011
Week 4
Modelling continued.

continuing from last week, the next step was the forehead. this is easily done by extruding up the edges from around the eyes, and then curving the top.

the overall head shape was then completed by carrying on the extrusion of the forehead and curving it over the top of the scalp, keeping in line with the side reference image in particular. the nose was then modelled by extruding the faces around the bridge of the nose, and then connecting edges using the bridge tool. the shape was created by simply moving the vertices around to match the reference image.

to complete the head, the neck was needed. this involved extruding down the back of the head, making sure to create as many extrusions as needed to weld accurately with the side of the head.

the completed head, with added definition around the eyebrows.
after completing the most complicated part, the body was relatively easy. this tutorial was used to help with body modelling, as the simple method was easy to use, but also gave a great end result : http://www.3dtotal.com/team/Tutorials/benmathis/benmathis_body_1.php
the tutorial idea is to use cylinders to model the body parts, as the human body has a cylindrical shape. using an eight sided cylinder gives all the necessary sides needed for a low poly character.

first the arm was modelled. a cylinder was placed along the reference image, and then the edges and vertices moved to represent the shape . this gives the definition of the arm including joints and muscle shape.

to make the body the same method was used, however this time it was a lot more important to look at both sides of the reference image. the first image shows the front. definition has been added around the pelvis and abdomen, and some around the chest.

here is the side image. definition was added for the chest and the shoulder blades.

a symmetry modifier was added to each part.
the legs were modelled the same as the arms. again the importance was on lining them up in both the front and side views, as there is a lot of definition in both.

the final step was to weld the parts together.
first the neck and head were attached at the object level, by selecting all the vertices of the head and then using the attach button. they can now be welded together.

the back of the neck was redone as there were too many faces, which meant it was hard to weld. the image above shows the much improved neck, with just 4 faces at the very back. to achieve the small amount of faces, the insert vertex tool was used. this allows vertices to be added along and edge without creating extra edges or faces. this meant that the multiple faces of the head could be welded to one edge on the neck (this can be seen in the above image, the one edge from the neck has been welded at many points, when there are about 6 edges on the head). the back of the head was also rounded more so re-doing the whole area was very beneficial.
Mathis, B., n.d. Low poly character modelling. [online] Available at: http://www.3dtotal.com/team/Tutorials/benmathis/benmathis_body_1.php [Accessed 21 February 2011].
Subscribe to:
Comments (Atom)